Menu

Show posts

This section allows you to view all posts made by this member. Note that you can only see posts made in areas you currently have access to.

Show posts Menu

Topics - charliem

#1
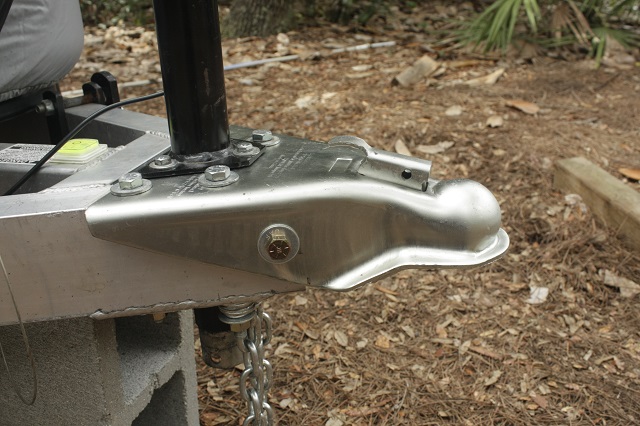
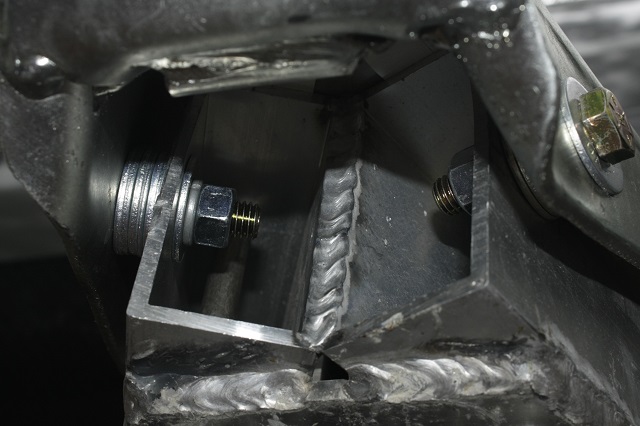
I've included a few pictures of the replacement coupler with added side bolts. The MSWord document describes some of the detail.

CharlieCoupler Solution 2.JPGCoupler Solution 2.JPGCouper Solution 1.JPGCoupler Solution 3.JPGCoupler Solution.docx
#2
For Sale: 2014 Camplite 21RBS (Pre-Thor)

camplite-1.jpg
All aluminum including floor, roof, cabinets.
Thick interlocking foam tile flooring added.
Custom dinette cushions and table.
Upgraded mattress.
Upgraded large SS kitchen sink and faucet.
Upgraded bathroom sink and shower fixtures..
Five new Goodyear tires and two new batteries.
SiriusXM satellite radio.
Three Fantastic Fans, two with rain covers.
SeeLevel tank monitors.
Voyager wireless rearview camera.
Custom reinforced rear bumper for bike rack (rack not included).
Electric tongue jack.
Fastway E2 weight distribution hitch.
Many more upgrades and accessories too numerous to list.
Price: $23,000.
Located near Fort Collins, CO.

#3
Livin Lite General Discussion / Merry Christmas to All
December 25, 2022, 10:50:40 AM
Mighty quiet here on the ACF. I'm still here and lurking. Got the LL out once this past season but hope to do more next year. For now all is flushed, drained and frozen.

Merry Christmas to all and, as Santa always says, Camp On.

Charlie - Northern Colorado
#4
Hey Guys,

I'm back! Still alive and anticipating upcoming camping season. Hopefully free of Covid.
I'm thinking of getting a battery-to-battery charger to charge the camper batts from the TV battery. My method of heavy jumper cables isn't working as well with the voltage limited charging systems in the newer vehicles. I'm thinking a B-to-B charger with good cabling would extend my time at no hookup sites. I'm looking at the Renogy 40A unit:

https://www.amazon.com/Renogy-Battery-Batteries-Multi-stage-Charging/dp/B07Q4SVX3M/ref=sr_1_3?keywords=battery%2Bto%2Bbattery%2Bcharger%2B12v&qid=1646518442&sr=8-3

Anybody got any thoughts, experience or recommendations?
Charlie


#5
Attached are additional pictures re the bent coupler problem.
#6
Livin Lite General Discussion / Charlie's Fourth Law
August 09, 2019, 04:03:39 PM
Charlie's Fourth Law: If you turn off the outside WH electric switch when winterizing, a good idea, you must remember to turn it back on in Spring, a really good idea. Otherwise the WH no workee and extreme irritation sets in, followed by extended self butt kicking.
While we're at it I saw a very depressing sight at a campground this week:  A Thor badge on a new AirStream.
#7
With all the reports of wall separation and cracked welds I decided to inspect my 21BHS before beginning this year's camping season. Happily all is well. The walls are in place, the welds are beautiful, the tongue is connected, the waste tanks are properly installed and secure and there are no freeze damaged pipes. I had previously replaced the beeping CO monitor that had passed its five year life span. The only problems found are a failed stove thermocouple and the known countertop delamination issues. Even the non Chinese BFGoodrich tires are looking good with no cracking. All as expected but then, I have a 2014 pre-Thor model. Thank you, Scott Tuttle.
#8
A few days ago I got a closeup look at a brand new 2018 Camplite 21RBS thanks to Bill and Robinette from Utah. The build date was late 2017 so it was close to, but not the last, build run. With all the things Thor has done to the LL product I felt it only fair to summarize what I saw. 
   
Things I liked: 
   
Five inch frame members.
HD coupler with side bolts.
Two step entrance step.
Better storage under dinette.
Kitchen drawers.
Double pane windows similar to original Dometics.
Screen shade combo similar, but need to be inverted for better privacy.
Better placement of interior controls and exterior hookups.
Installed battery disconnect switch.
Much better counter top.
Composite floor looks good, feels warmer, longevity unknown.
 
Things I didn't like:   
Tiny wobbly table, needs work.
Double hanging lockers at head of bed. More hanging storage but limits shoulder room and hinders bed makeup.
Same small sinks; need upgrading. 
Rubber roof. Looks nice but ? ? 
Leaf spring axles ?? 
Mood lighting, illuminated outside speakers ehh? 
Interior wood cabinet facing looks nice but aircraft latches gone.


I didn't get to check where the shower drained or other issues recently reported by @Gary M 
Overall my impression was surprisingly positive. The aluminum cabinet option is (was) available so my major negative issues remain the roof and possibly the floor, I don't know what to think about the leaf spring axles.
#9
Sighted a new red Camplite driving through Yosemite NP. Later the same one pulled into our campground in Sparks, NV! Met Bill and Robinette from SLC area, UT. It was a brand new (late 2017 mfg) 21RBS on its maiden cruise. We swapped Camplite experiences/hints and I got a good look at construction/features of the last build run. More on that later. I pitched our forum and they seemed very interested so give them a big welcome if they log in.
#10
To all my fellow CL owners suffering from check valve failure on ShurFlo 4008 series pumps. Symptoms are frequent pump cycling with no apparent leaks and/or city water backfilling the FW tank. The steps are:

       
  • Order ShurFlo check valve replacement kit P/N 94-800-03
  • Remove three screws
  • Remove and replace three plastic parts and one spring
  • Reassemble and reinstall three screws
  • Check for leaks
Ten minutes if you're slow. I didn't even have to remove the pump. Simple fix when the standard "recycle to remove sand" procedure doesn't work.
#11
I am reposting this info for new owners. The original discussion is archived but is separated from the graphics. The improper installation of the gray, and possibly black, tank vent greatly reduces the usable volume of the tanks, leading to premature drain backup and overflow. This problem was solved when the factory became aware of it, but is certainly subject to reappearance depending on installer knowledge, experience, supervision, training and the time/day of the week.

To further the conversation on the gray tank problem I submit the attached drawings.Figure 1 is a schematic of the gray water system on a 21RBS, but it should be representative of other models with exception of the bathroom sink. Gray water fills the tank through two entry pipes. One drains the shower and also serves as the wet vent for the tank. The two sinks are combined to drain through the second entry pipe. Each drain has a P-trap to prevent tank gasses from backing up into the trailer. The shower is directly vented by the wet vent. Each sink is vented by an Air Admittance Valve (AAV). These AAVs let air into the drain pipe downstream from the P-trap to prevent water from siphoning out of the traps. As shown in the drawing both entry pipes are connected to, but do not penetrate, the gray tank. This is the ideal installation. Air displaced by additional water from either entry pipe is vented out the wet vent to the trailer roof.  Note that the vertical scale is not accurate. The tank itself is only about six inches tall.Figure 2 depicts an installation error where the vent pipe extends some distance into the tank. The drains will perform properly until the water level reaches the bottom of the vent pipe. At this point the trapped air can no longer exit via the vent, but will be forced back up the sink drain pipe and out one of the sink P-traps. This causes the gurgling sound and water from the traps being splattered out of the sinks. I believe this is the condition we are seeing. Depending on how far the vent pipe protrudes into the tank, symptoms will appear at various levels less than 100% full.Figure 3 depicts a similar situation, but the pipe from the sinks is pushed too far into the tank. I believe this is physically possible during assembly, but I don't have any idea how probable it is. I'm still trying to think through the symptoms from this configuration. I think air trapped in the sink drain stack would be compressed and forced out one of the sink P-traps as water is added. This may cause gurgling, but it might just make the sinks drain very slowly. Either way the tank will act as if it's full long before it really is. Each time a sink is emptied the AAV will let a new charge of air into the pipe. More thought is required here. In a properly operating system the gray water should begin to back up into the shower first because the shower is the lowest drain. All this assumes the AAVs are working properly, admitting air in only one direction. If an AAV is stuck open, or not even there, the tank will be vented out the failed AAV. In Fig 2 the tank will appear to be filling correctly, but any tank odors will vent into the trailer. In Fig 3 it's probably similar, but I'm still thinking on this. If an AAV is stuck closed there is probably an effect on the sink P-traps. If sucked dry, odors will back up into the trailer through the dry P-trap.So what's the worst case? Figure 2 and a failed or absent AAV. The drains would work properly, but odors could be noticeable. If, as some campers do, the sewer hose is left connected to the CG sewer, the gray drain valve is left open, an AAV is stuck open, and a vent fan is running. Phewweee! All comments, suggestions, additions, or subtractions are welcome. My goal is to build an understanding for us and LL so this problem can be put in the history file.   
#12
At the rate LL is replacing floors, walls, cabinets they soon will no longer be able to claim an aluminum camper. Soon to be an "aluminum free camper".
#13
Off Topic / Moved from Florida to Colorado
May 23, 2017, 10:23:28 AM
 :) :D 8) We've moved from hot, wet, hurricaned Florida to cool, beautiful, dry windy Northern Colorado. Just east of the Rockies near Fort Collins. No more hurricanes, fire ants, 90% RH. We are returning to CO after a 27 year exile in FL. New place, new house, new people, everything still in boxes. Really looking forward to camping adventures in the West. We've made this trip every year but it took 4 days to get here and 4 days back.  :) :D 8)
#14
Insulating Water Pipes on 21RBS.

This project is the first step in preparing the CL for overnight freezing temperatures. It is not intended to replace winterization for the long haul, but is intended to combat overnight dips into the twenties with warmups to above freezing the next day. I have described , on another post, an active circulating system that will prevent freezing for as long as propane and 12V are available,  but pipe insulation is first.
I used closed cell polyethylene pool noodles, but hardware store foam pipe insulation should work as well.  Slitting the noodles and liberal use of zip ties makes the installation easy and secure.  Where practical I wrapped both hot and cold pipes together in one noodle. This allows the hot pipes to warm the cold pipes. It will particularly valuable when the circulating system is operational. Turns out pool noodles come in various sizes depending on manufacturer. I found inner diameters of 0.75" ,1", and 1-1/4". Outside diameters varied accordingly. The smaller version is good for the single pipe locations; the largest is better for double runs. The 1" version can be used for double runs where space is limited, but it takes more frequent zip ties. The larger versions will insulate better, but the difference is minimal.I had to loosen the tank supports and reroute the water pipes outside the brackets to allow installation of the noodles. To retain the low point drain operation I tried to maintain close to the original elevation profiles.  Not a big deal if you winterize with compressed air or antifreeze, but the CL does a pretty good job of draining through the low point drains, including the HW heater. Some areas cannot be fitted with the pool noodles. Exposed fittings and the low point drain valves are still vulnerable, but for short periods they should survive on conducted heat from the insulated portions. Don't forget to insulate the fresh water suction hose.
#15
This is a repost of my original kitchen water filter addition suggestion.

Thanks to TinkeringTechie for the original inspiration.  The filter is mounted to the frame tubing in the lower cabinet under the sink. I was afraid of supporting the mass of the filled filter with just the supplied bracket under travel conditions so I added a tie down at the bottom, secured by zip ties. Velcro could also be used, but I don't expect to replace the filter every month. The bottom 1x2 is also mounted to the cabinet frame. As usual when I over design a mod, the filter now contributes to the structure  ;) .

https://www.amazon.com/Culligan-US-EZ-4-EZ-Change-Under-Sink-Drinking/dp/B000NNPVUS/ref=sr_1_2?s=kitchen-bath&srs=2587953011&ie=UTF8&qid=1462899375&sr=1-2&keywords=culligan+water+filter
#16
This is a repost of my original Camplite kitchen sink upgrade. The attached MS Word document has the details including suggested sources. Currently I do not recommend the faucet I used. It works very well but tends to turn itself on when traveling. Not a problem if you turn off the pump but can be an issue when hooking up at a CG or stopping on the road. There are others available. PM me if more info is desired.
#17
Camplite Bumper Enhancement

The factory supplied Camplite bumper is not adequate for mounting bicycle carriers. It does not support 4x4" receiver mounts and will not withstand the torque imposed by bicycles on rough roads. The drawing and pictures below describe the proper modification. This particular modification was performed to my drawing by the LL factory when they entertained custom upgrades. Since this service is no longer available it will have to be accomplished by a qualified third party welding shop.

Note that aluminum welding is considerably more demanding than ordinary steel welding and  that simply adding a 2x4 aluminum tube onto the back of the existing bumper is not sufficient. That does nothing to address the OEM weld structure and is even worse than the original bumper due to the added torque developed. The added 2x4 tube must be added in front of the original bumper and welded to the original bumper and the frame rails on each side.

Pictures attached.

#18
21RBS Water Circulator reposted from original forum:

The circulator is designed to combat overnight subfreezing temperatures with a warm up the next day, but will also function while being towed which allows towing in freezing temps. In operation hot water is allowed to flow from the kitchen sink faucet back into the fresh water tank below. The existing  pump and HW heater provide pressure and heat so these need not be duplicated. Only an electric solenoid valve and inexpensive programmable timer are required for operation. Although designed for the 21RBS the principles can be applied to other models.

Although primarily designed for subfreezing operation with city water disconnected the pushbutton provides manual operation in cases where fresh water supply and/or gray water storage are limited. The pushbutton minimizes wasted water while waiting for HW at the sink or shower. The timer is programmed to open the valve for 1 minute every 45 minutes over a 12 hour overnight period. SW1 powers the timer and indicator light. The switch handle and LED give an easy visual indication of ready and is easier than pushing the timer Auto/On/Off  button and reading the tiny display. The ball valve limits flow to prevent overflow out of the vent hose and is used in conjunction with the section of clear vinyl tubing to adjust for proper flow rate.

Pictures attached.
#19
Table Mod Version 2.0, Reposted from Original Forum

This is the second attempt to modify the 21RBS dinette table. I tried the original single post and an upgraded marine locking post and both were too wobbly. Then I custom designed a table with a special order laminated foam core top attached to the wall . Larger and very stable, but the top warped and suffered from edge trim delamination. So I've now gone to a new custom design made completely of that four letter word: wood. The detachable leaf provides better access with the slide in.   The results are:

       
  • Does not wobble
  • Travels with slide
  • Allows access to bath and fridge with slide in for road travel or cold nights
  • Provides optional smaller table
  • Should not warp
  • Retains dinette bed function
The table is fabricated from 1/2" Birch plywood and 1" Oak stock. The table has been field and wife tested and works well. The following links are to some of the hardware used:

https://www.amazon.com/Products-013-071-Folding-Table-Leg/dp/B002N5YF2O/ref=pd_sim_auto_2?ie=UTF8&refRID=01FG0CMM36W81K0TJEDN

https://www.amazon.com/Patrick-Metals-164922-Support-Sliding/dp/B004OHTRE0

http://www.rockler.com/table-leaf-aligners-6-pairs

http://www.rockler.com/metal-drop-leaf-support

http://www.acehardware.com/product/index.jsp?productId=53088306

Pictures attached.


#20
Member Introductions / Hello LL Owners
December 28, 2016, 09:22:34 PM


Hello fellow LL owners. I'm lamenting the loss of the Livinlite-Owners site but glad Paul has made this one available. Thank you, Paul.

I doubt I'll be as verbose as I was over there since most of the early problems have been beat to death and solved.  Thor is including several fixes on current production models and Doug Samuel has moved some solutions over here. I'll repost others as they come up. My main purpose will be to answer questions from new members and owners.  I still think LLs are a great camper and LL owners are a great bunch of folks. I'm glad we made this trip together and look forward to continuing with you all down the LL camping road.

As I've said before and continue to say: CAMP ON!